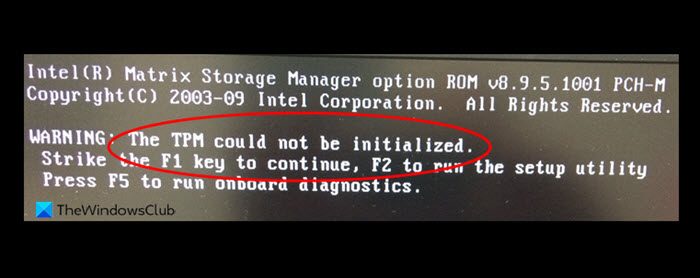
When you encounter this issue, you’ll receive a similar full error message along the following lines;
TPM could not be initialized after BIOS update
If you’re faced with the issue whereby The TPM could not be initialized after BIOS update on your Windows 11/10 PC, you can try our recommended solutions in the order presented below and see if that helps to resolve the issue on your system. Let’s take a look at the description of the process involved concerning each of the listed solutions. Before you proceed with the solutions below, unplug the LAN cable or power cable (if applicable) from your PC before you boot the system and see if the error reappears.
1] Rollback BIOS update
Since the error The TPM could not be initialized occurred after a BIOS update, your first line of troubleshooting to resolve the issue is to rollback the BIOS update. To do this, you can follow the instructions in the guide on how to downgrade BIOS version on Windows 11/10 computer.
2] Enable/Disable TPM in BIOS
This solution requires you to enable or disable TPM in BIOS depending on the current status. The instructions will vary from OEM to OEM. Do the following:
Boot into BIOS (if unable, see Windows 11/10 computer won’t boot to BIOS).Select the Security tab.Select the TPM option (if not available, see TPM missing or not showing in BIOS) and hit Enter.Now, select Enabled or Disabled as the case may be.Press F10 to Save and Exit.Reboot your computer.
If during boot the error reappears, try the next solution.
3] Update and Clear TPM
To apply this solution, you’ll have to see if you can boot into Safe Mode and then Update and Clear TPM security processor firmware. The update for TPM usually holds a patch for a security vulnerability which can impact operating system security. The update which you will need to download and install on your device will address any vulnerability. Clearing your TPM will reset your security processor to its default settings.
4] Reset TPM
This solution requires you to reset the TPM which is not the same as clearing the TPM. During a TPM reset, the computer will attempt to redetect the TPM and preserve the data contained within the module. To perform a TPM reset on your computer depends on the PC (desktop or laptop) in use. To reset TPM on a Windows 11/10 laptop, do the following:
Unplug the AC adapter.Shut down the computer.Disconnect any USB devices.Now, turn on the computer and boot into BIOS.
If TPM is available under Security, no further actions are required. But if TPM is not present, do the following:
Turn off the computer.Remove the battery from the bay (if the battery is removable).Next, press and hold the power button for over 60 seconds to discharge static power.Next, reinsert the battery in the bay.Plug in the AC adapter.Finally, turn on the computer.
To reset TPM on Windows 11/10 desktops and all-in-ones, do the following:
Turn off the computer.Unplug the power cable from the back of the computer.Press and hold the power button for over 60 seconds to discharge static power.Connect the power cable to the back of the computer.Turn on the computer.
5] Perform System Restore
A viable solution to the issue in hand is to perform System Restore (any changes like application installs, user preferences, and anything else made after the restore point will be lost) – but this isn’t the usual, since your PC is unable to boot successfully to the desktop. So, in this case, to resolve the issue, you need to follow the instructions in the guide on how to perform System Restore when Windows won’t boot to desktop.
6] Replace motherboard
As a last resort, if nothing has worked so far to resolve the issue in view, you may have to replace the motherboard. Some affected PC users reported that replacing the MOBO fixed the issue; citing possible bad batch of MOBOs. Hope this post helps you! Related post: Fix Alert! TPM device is not detected error on Dell computers
How do I fix TPM could not be initialized?
To fix TPM could not be initialized on your Windows 11/10 Dell system, do the following:
Boot your Dell computer and press F2 to enter the BIOS menu.Go to the Security tab on the left side and expand it.Click on the TPM option and then check the box of Disabled on the right side.Select Apply and reboot your computer.
Why is TPM disabled by default?
If Platform Trust Technology (PTT) is enabled on a system by default, TPM will be greyed out in BIOS because only one of these trust technologies can be enabled at a time. To enable TPM, PTT protection must be removed from the encryption keys.
Should I enable TPM in BIOS?
In any event, it is not recommended to disable TPM on your computer (unless in cases where it’s absolutely necessary), as doing so simply weakens the security of your system with no upside benefit.